Homemade Bread Gift Idea | Put a Smile on Someone's Face
A heartfelt homemade gift is a wonderful way to let people know that you care. So, why not spread some cheer around and brighten up someone's day with a homemade French Boule bread straight from your heart to their hands?
This warm, delicious Country Boule is a perfect hostess gift during Thanksgiving or the holiday season or for a neighbor, teacher or friend... no reasons required.
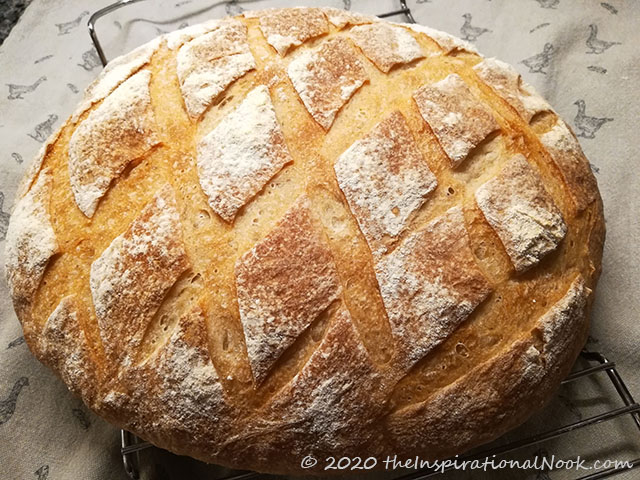
A homemade food gift needs a few of your own personal touches to make it memorable and special. Remember, it can taste wonderful, but it also needs to be visually appealing. There are so many pleasing bread scoring patterns to choose from, but my favorite one to use is the relatively easy cross hatch pattern.
As Apicius, a first century Roman gourmand, once said:
We eat first with our eyes.
The crosshatch bread scoring technique creates decorative diamond cuts which makes for an attractive loaf. Now, that's one good-looking bread, even if I say so myself!
I followed King Arthur's French Country Bread recipe for to make this boule. As King Arthur says, you can bake this bread for the rest of your baking career and never feel cheated. And I completely agree. This bread does not disappoint. (Recipe at end of post)
HOW TO SCORE A BOULE |
Cross Hatching- A decorative bread scoring technique
Cross hatching is a bread scoring technique that makes those attractive diamond shaped patterns on the bread. It serves two purposes. Firstly, it's decorative (doesn't it look gorgeous?). And secondly, it creates weak spots on the bread to prevent the bread from bursting at inopportune places during baking.
Using a really sharp razor blade or lame knife, start at one end of the bread, and quickly and confidently, make 5 parallel cuts across the surface of the loaf. Now starting a 45° angle from the first cut, make another series of 5 cuts to create the beautiful diamond shape pattern across the surface of the loaf.
GIFT WRAPPING THE BREAD
The next step is beautifully packaging your bread. And this is where you can and should add your own personal touches. It's also the easiest and most fun part.
Wrapping bread in brown or white parchment paper tied up with twine is an easy, old fashioned way to lend farmhouse, country style appeal.
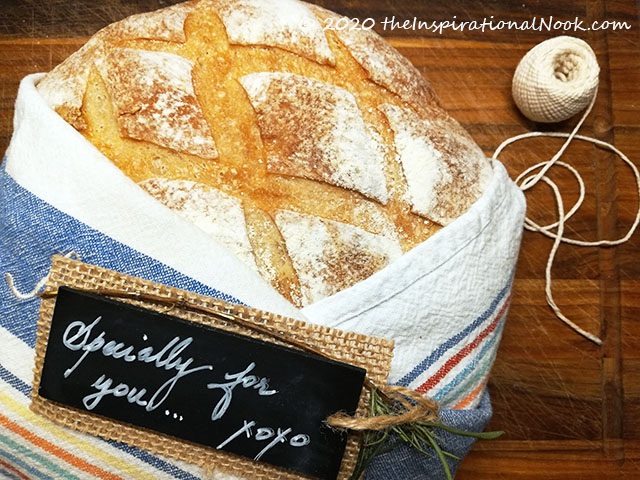
However, for round loaves of bread, I prefer to use a new dish cloth instead of parchment paper. Dish cloths are always welcome gifts that a hostess can use long after the bread is gone. Plus, I like to have the bread peep out of the wrap. This would be impossible if I used parchment paper...the bread would just slip out.
Fold the dish cloth around the bread, much like wrapping a baby after a bath :). Tie with twine and add a little gift tag with a special note. This simple chalkboard and burlap gift tag is from the Dollar Store. I slipped in a little stem of rosemary from my garden and this baby is ready to go.
The entire package can be slipped into a clear, plastic sleeve and tied up with twine to keep the bread clean and fresh.
Now go put a smile on someone's face! It doesn't cost much, but the gesture is priceless.
How to make a French Boule Bread | Recipe for a Country Boule
Adapted from King Arthur's French Style Country Bread
Ingredients:
Poolish Ingredients (Pre-Ferment)
☐ 1/2 teaspoon active dry yeast
☐ 1 1/2 cups (175g) 100% Whole Wheat Flour
Dough Ingredients
☐ 1 cup lukewarm water
☐ 3/4 teaspoon active dry yeast
☐ 1 tablespoon of sugar
☐ 4 cups (500g) Unbleached Bread Flour
☐ 1 teaspoon salt, to taste
Step by Step Instructions:
Step 1: Make Poolish (The Night Before)
- Mix all of the poolish ingredients together in a large bowl, stir well, cover and leave overnight.
Step 2: Mix Ingredients (Next day)
- Next morning, add dough ingredients (except flour) to the poolish and stir well, begin to incorporate flour and continue stirring till about 100g of flour is left (set this flour aside for later).
- Let mixture stand for 15 minutes (do not skip this step).
- Knead by hand for 10 minutes adding set aside flour as needed, make into a ball.
Step 3. Allow for First Rise
- Grease a bowl with olive oil, place dough ball and swirl it around to ensure oil coats all sides. Leave till it doubles in size (about 60 minutes).
- Slowly ease dough onto a lightly floured surface. Let it rest for about 30 seconds.
- Cut into 2 halves, make balls by tucking under.
Step 4: Allow for Second Rise
- Set dough balls onto baking sheet lined with parchment paper and let rise till 50% larger (about 45 minutes).
Step 5: Bake
- Pre-Heat oven to 475°F, and place a tray in the bottom rack (used for steaming).
- Sprinkle rice flour on the dough balls, scour with a blade/ lame knife in a cross hatch pattern. Immediately place in center rack of preheated oven
- Pour 2 cups of warm water in the bottom tray to create steam, and quickly but gently close the oven.
- Bake at 475°F for the first 10 minutes, and 425°F for the remaining 20 minutes.

